2022. 11. 29. 16:19ㆍ리눅스(Linux)
Linux Backup System 구축 및 관리
$ Tar를 이용 한 "Full Backup"
[ 절대 경로를 이용 한 Tar Backup ]
# tar cvfzp /backup/var_log.tar.gz --exclude=/var/log/vmware* /var/log
# rm -rf /var/log
# tar xvfzp /backup/var_log.tar.gz -C /
   - 절대 경로를 이용 한 Tar Backup의 경우 Backup 대상의 상위경로를 함께 포함 한다.
   - /var/log 디렉터리를 Backup 하지만, /var 디렉터리를 포함하여 Backup이 진행 된다.

[ 상대 경로를 이용 한 Tar Backup ]
# cd /var/log
# tar cvfzp /backup/var_log.tar.gz --exclude=/var/log/vmware* ./*
# cd ~
# rm -rf /var/log
# mkdir /var/log
# tar xvfzp /backup/var_log.tar.gz -C /var/log
   - 상대 경로를 이용 한 Tar Backup의 경우 Backup 디렉터리 내부의 데이터만 Backup을 진행
   - 상대 경로와 절대 경로의 Backup의 차이점이 있으므로 상황에 맞게 선택하여 작업을 진행
$ Tar를 이용 한 "증분 Backup"
# mkdir /test
# echo "1" > /test/test1.txt
# echo "2" > /test/test2.txt
# cd /test
# tar -g /backup/backup-0.snap -zcvpf /backup/backup-0.tgz ./*
./test1.txt
./test2.txt
# ls /backup
backup-0.snap backup-0.tgz
# tar tf /backup/backup-0.tgz
./test1.txt
./test2.txt
   - 증분 Backup의 경우 Archive 파일의 이름은 tgz로 지정하고, snapshot 파일을 생성 후 작업을 진행한다.
   - 증분 Backup의 경우에도 최초 1회는 Full Backup으로 진행 된다.
   - 증분 Backup 작업시에는 옵션의 순서가 매우 중요하며, 반드시 "f" 옵션은 가장 마지막에 위치하는 것이 좋다.
   - snapshot 파일의 역할은 현재 Backup이 완료 된 데이터의 목록을 저장하고 있는 역할
   - snapshot 파일을 이용하여 현재 Backup이 완료 된 데이터와 완료되지 않은 데이터를 구분할 수 있게된다.

# echo "3" > /test/test3.txt
# tar -g /backup/backup-0.snap -zcvpf /backup/backup-1.tgz ./*
./test3.txt
# ls /backup
backup-0.snap backup-0.tgz backup-1.tgz
# tar tf /backup/backup-1.tgz
./test3.txt
   - 두 번째 Backup을 진행 할 경우 새로 추가 된 test3.txt 파일만 Backup을 진행하는 것을 확인 할 수 있다.

# echo "4" > /test/test4.txt
# tar -g /backup/backup-0.snap -zcvpf /backup/backup-2.tgz ./*
./test4.txt
# ls /backup
backup-0.snap backup-0.tgz backup-1.tgz backup-2.tgz
# tar tf /backup/backup-2.tgz
./test4.txt
   - 세 번째 Backup 또한 새로 추가 된 test4.txt 파일만 Backup을 진행하는 것을 확인 할 수 있다.
$ 증분 Backup 데이터 복원
# cd ~
# rm -rf /test
# mkdir /test
   - 데이터 복원 테스트를 위해 기존에 사용중인 Test 디렉터리를 삭제

# tar xvzpf /backup/backup-0.tgz -C /test
# ls /test
test1.txt test2.txt
# tar xvzpf /backup/backup-1.tgz -C /test
./test3.txt
# tar xvzpf /backup/backup-2.tgz -C /test
./test4.txt
   - 데이터 복원의 경우 반드시 가장 첫번째로 진행 된 Full Backup 파일부터 작업을 진행 한다.
   - 이후 순차적으로 나머지 Backup Archive 파일의 압축해제 작업을 진행

# ls /test
test1.txt test2.txt test3.txt test4.txt
# rm -rf /backup/*
# rm -rf /test
# cd ~
   - 데이터 복원 테스트 완료 후 위에서 테스트했던 내용은 삭제를 진행한다.
$ Tar를 이용 한 "차등 Backup"
# mkdir /test
# echo "1" > /test/test1.txt
# echo "2" > /test/test2.txt
# cd /test
# tar -g /backup/backup-0.snap -zcvpf /backup/backup-0.tgz ./*
./test1.txt
./test2.txt
# ls /backup
backup-0.snap backup-0.tgz
# tar tf /backup/backup-0.tgz
./test1.txt
./test2.txt
   - 차등 Backup의 경우 기존 증분 Backup 1회차 작업과 동일하게 작업을 진행
   - Archive 파일의 이름은 tgz로 지정하고, snapshot 파일을 생성 후 작업을 진행한다.

# cp /backup/backup-0.snap /backup/backup-1.snap
# echo "3" > /test/test3.txt
# tar -g /backup/backup-1.snap -zcvpf /backup/backup-1.tgz ./*
./test3.txt
# ls /backup
backup-0.snap backup-0.tgz backup-1.snap backup-1.tgz
# tar tf /backup/backup-1.tgz
./test3.txt
# rm -rf /backup/backup-1.snap
   - 차등 Backup 진행 시 기존 snapshot 파일을 복사하여 새로운 snapshot 파일을 생성 후 Backup을 진행한다.
   - 차등 Backup 진행 후 복사 한 snapshot 파일은 다시 삭제작업을 진행
   - 차등 Backup의 개념은 최초 1회 Full Backup 진행, 이후 작업은 증분 Backup을 수행하는데 새로 증가 된 데이터에 대해서만 Full Backup을 진행하는 개념
   - 즉 새로운 Backup Archive 파일을 계속해서 만들 필요가 없으므로, 최초 Full Backup Archive 파일과 증가분에 대한 Full Backup을 진행 한 Archive 파일만 존재하면 된다.

# cp /backup/backup-0.snap /backup/backup-1.snap
# echo "4" > /test/test4.txt
# tar -g /backup/backup-1.snap -zcvpf /backup/backup-1.tgz ./*
./test3.txt
./test4.txt
# ls /backup
backup-0.snap backup-0.tgz backup-1.snap backup-1.tgz
# tar tf /backup/backup-1.tgz
./test3.txt
./test4.txt
# rm -rf /backup/backup-1.snap
   - 다시 snapshot 파일을 복사하여 새로운 snapshot 파일을 생성 후 Backup을 진행
   - 최초 Backup 된 test1.txt, test2.txt를 제외 한 2개의 파일이 Backup 되는 것을 확인 할 수 있다.

# cp /backup/backup-0.snap /backup/backup-1.snap
# echo "5" > /test/test5.txt
# tar -g /backup/backup-1.snap -zcvpf /backup/backup-1.tgz ./*
./test3.txt
./test4.txt
./test5.txt
# ls /backup
backup-0.snap backup-0.tgz backup-1.snap backup-1.tgz
# tar tf /backup/backup-1.tgz
./test3.txt
./test4.txt
./test5.txt
# rm -rf /backup/backup-1.snap
   - 다시 snapshot 파일을 복사하여 새로운 snapshot 파일을 생성 후 Backup을 진행
   - 증가 된 데이터맊 Full Backup을 진행하는 것을 확인한다.
$ 차등 Backup 데이터 복원
# cd ~
# rm -rf /test
# mkdir /test
# tar xvzpf /backup/backup-0.tgz -C /test
# ls /test
test1.txt test2.txt
   - 데이터 복원 테스트를 위해 기존에 사용중인 Test 디렉터리를 삭제

# tar xvzpf /backup/backup-1.tgz -C /test
./test3.txt ./test4.txt ./test5.txt
# ls /test
test1.txt test2.txt test3.txt test4.txt test5.txt
   - 데이터 복원의 경우 반드시 가장 첫번째로 진행 된 Full Backup 파일부터 작업을 진행 한다.
   - 차등 Backup의 경우 추가로 구성 된 Backup Archive 파일만 압축해제를 진행하면 모든 데이터가 복원이 된다.

# rm -rf /backup/*
# rm -rf /test
# cd ~
   - 데이터 복원 테스트 완료 후 위에서 테스트했던 내용은 삭제를 진행한다
$ Tar test
[ 새로운 40GB HDD 추가후 작업 진행 ( 반드시 SingleFile 형식으로 추가 ) ]
# fdisk /dev/sdb ( n -> p -> 1 -> Enter -> Enter -> w )
# mkfs.xfs /dev/sdb1
   - Tar를 이용하여 전체 시스템의 File을 Backup
   - Backup Data 저장 위치 : /dev/sdb1 ( 40GB ) : /backup/back.tar.gz
   - Backup Data 복원 위치 : /dev/sdb1 ( 40GB ) : /backup/Recovery

[ Backup 제외 대상 ]
   - 자기 자신
   - 현재 동작중인 정보를 저장하는 프로세스 파일 ( proc , sys, boot, run, lost+found )
   - 다른 저장 장치와 연결되어있는 디렉터리 ( mnt , media, dev )
   - 그외 임시저장소와 같은 디렉터리 및 파일은 전부 제외 ( tmp )

# tar cvzpf /backup/back.tar.gz --exclude=/backup --exclude=/mnt --exclude=/media \
--exclude=/sys --exclude=/dev --exclude=/proc --exclude=/lost+found --exclude=/run --exclude=/boot /*
   -  명령어가 길 경우 라인을 변경하여 입력해야 하므로, "\" Key를 이용하여 명령어 이어 붙이기 작업 진행

# tar xvzpf /backup/back.tar.gz -C /backup/Recovery
# ls /backup/Recovery
bin etc home lib lib64 opt root sbin srv tmp usr var
   - 정상적으로 데이터 복원이 완료 된 것을 확인
$ xfsdump & xfsrestore를 이용한 FileSystem Backup
[ 새로운 1GB HDD 추가후 작업 진행 ]
# fdisk /dev/sdb ( n -> p -> 1 -> Enter -> Enter -> w )
# mkdir /backup
# mkfs.xfs /dev/sdb1

# vi /etc/fstab
/dev/sdb1 /backup xfs defaults 0 0

# mount /dev/sdb1 /backup

# df -h
/dev/sda1 1014M 222M 793M 22% /boot
/dev/sdb1 1020M 33M 988M 4% /backup

# xfsdump -L "Backup of /boot" -M "Backup Media:/dev/sdb1" -l 0 -f /backup/boot.bak /boot
xfsdump: using file dump (drive_simple) strategy
xfsdump: version 3.1.7 (dump format 3.0) - type ^C for status and control
xfsdump: level 0 dump of localhost.localdomain:/boot
xfsdump: dump date: Mon Mar 9 16:48:17 2020
xfsdump: session id: 195e9ad6-c507-4c49-8016-b95cb97979bc
xfsdump: session label: "Backup of /boot"
xfsdump: ino map phase 1: constructing initial dump list
xfsdump: ino map phase 2: skipping (no pruning necessary)
xfsdump: ino map phase 3: skipping (only one dump stream)
xfsdump: ino map construction complete
xfsdump: estimated dump size: 198604160 bytes
xfsdump: creating dump session media file 0 (media 0, file 0)
xfsdump: dumping ino map
xfsdump: dumping directories
xfsdump: dumping non-directory files
xfsdump: ending media file
xfsdump: media file size 198285416 bytes
xfsdump: dump size (non-dir files) : 198035552 bytes
xfsdump: dump complete: 1 seconds elapsed
xfsdump: Dump Summary:
xfsdump: stream 0 /backup/boot.bak OK (success)
xfsdump: Dump Status: SUCCESS

# xfsdump -I
file system 0:
 fs id: 854f566b-6efe-4379-9b9b-166b73b41485
 session 0:
 mount point: localhost.localdomain:/boot
 device: localhost.localdomain:/dev/sda1
 time: Mon Mar 9 16:48:17 2020
 session label: "Backup of /boot"
 session id: 195e9ad6-c507-4c49-8016-b95cb97979bc
 level: 0
 resumed: NO
 subtree: NO
 streams: 1
 stream 0:
 pathname: /backup/boot.bak
 start: ino 68 offset 0
 end: ino 1572933 offset 0
 interrupted: NO
 media files: 1
 media file 0:
 mfile index: 0
 mfile type: data
 mfile size: 198285416
 mfile start: ino 68 offset 0
 mfile end: ino 1572933 offset 0
 media label: "Backup Media:/dev/sdb1"
 media id: 7020d839-68b8-4d50-85df-b393948da311
xfsdump: Dump Status: SUCCESS

# ls -l /backup
합계 193640
-rw-r--r-- 1 root root 198285416 3월 9 16:48 boot.bak
   - 자기 테이프 저장장치와 같이 데이터를 이어서 저장 할 수 있는 장치의 경우 정상적으로 테스트가 가능
   - 일반 파티션의 경우 데이터를 이어서 저장 할 수 없으므로 Backup Test는 1회만 진행 후 Restore Test만 진행한다.
   - 자기 테이프의 장치명은 "/dev/st0" 으로 기본 설정 된다.

# mkdir /test
# xfsrestore -f /backup/boot.bak -r /test
xfsrestore: using file dump (drive_simple) strategy
xfsrestore: version 3.1.7 (dump format 3.0) - type ^C for status and control
xfsrestore: searching media for dump
xfsrestore: examining media file 0
xfsrestore: dump description:
xfsrestore: hostname: localhost.localdomain
xfsrestore: mount point: /boot
xfsrestore: volume: /dev/sda1
xfsrestore: session time: Mon Mar 9 16:48:17 2020
xfsrestore: level: 0
xfsrestore: session label: "Backup of /boot"
xfsrestore: media label: "Backup Media:/dev/sdb1"
xfsrestore: file system id: 854f566b-6efe-4379-9b9b-166b73b41485
xfsrestore: session id: 195e9ad6-c507-4c49-8016-b95cb97979bc
xfsrestore: media id: 7020d839-68b8-4d50-85df-b393948da311
xfsrestore: using online session inventory
xfsrestore: searching media for directory dump
xfsrestore: reading directories
xfsrestore: 11 directories and 349 entries processed
xfsrestore: directory post-processing
xfsrestore: restoring non-directory files
xfsrestore: restore complete: 1 seconds elapsed
xfsrestore: Restore Summary:
xfsrestore: stream 0 /backup/boot.bak OK (success)
xfsrestore: Restore Status: SUCCESS
   - 저장 된 Dump File을 이용하여, 데이터 복원작업을 진행
   - 복원 대상 디렉터리 "/test "

# ls -l /test
합계 177768
-rw-------. 1 root root 3599493 2월 5 08:07 System.map-3.10.0-1062.12.1.el7.x86_64
-rw-------. 1 root root 3113253 11월 23 2016 System.map-3.10.0-514.el7.x86_64
-rw-r--r--. 1 root root 153187 2월 5 08:07 config-3.10.0-1062.12.1.el7.x86_64
-rw-r--r--. 1 root root 137696 11월 23 2016 config-3.10.0-514.el7.x86_64
drwx------. 3 root root 17 11월 9 2018 efi
drwxr-xr-x. 2 root root 27 3월 4 11:37 grub
drwx------. 5 root root 132 3월 4 14:32 grub2
-rw-------. 1 root root 64489675 3월 4 11:42 initramfs-0-rescue-bc40271ea9f649ed9f6c25bdef33c2c6.img
-rw-------. 1 root root 31933651 3월 4 14:32 initramfs-3.10.0-1062.12.1.el7.x86_64.img
-rw-------. 1 root root 31656945 3월 4 14:33 initramfs-3.10.0-514.el7.x86_64.img
-rw-------. 1 root root 18598066 3월 4 11:48 initramfs-3.10.0-514.el7.x86_64kdump.img
-rw-r--r--. 1 root root 10209722 3월 4 11:42 initrd-plymouth.img
-rw-r--r--. 1 root root 318984 2월 5 08:07 symvers-3.10.0-1062.12.1.el7.x86_64.gz
-rw-r--r--. 1 root root 277953 11월 23 2016 symvers-3.10.0-514.el7.x86_64.gz
-rwxr-xr-x. 1 root root 5392080 3월 4 11:42 vmlinuz-0-rescue-bc40271ea9f649ed9f6c25bdef33c2c6
-rwxr-xr-x. 1 root root 6734016 2월 5 08:07 vmlinuz-3.10.0-1062.12.1.el7.x86_64
-rwxr-xr-x. 1 root root 5392080 11월 23 2016 vmlinuz-3.10.0-514.el7.x86_64
drwx------ 2 root root 78 3월 9 17:22 xfsrestorehousekeepingdir
   - 실제 /boot 디렉터리의 데이터가 그대로 복원되어있는 것을 확인 할 수 있다.
$ dd를 이용한 Disk 복제
[ 새로운 40GB HDD 추가후 작업 진행 ( 반드시 SingleFile 형식으로 추가 ) ]
# fdisk /dev/sdb ( n -> p -> 1 -> Enter -> Enter -> w )
# mkfs.xfs /dev/sdb1
# touch ./a ./b ./c ./d
# dd if=/dev/sda of=/dev/sdb bs=64K
655360+0 records in
655360+0 records out
42949672960 bytes (43 GB) copied, 109.124 s, 394 MB/s
   - 복구 테스트를 위한 파일 4개 생성
   - 새로 추가 된 40GB HDD ( /dev/sdb )
   - 기존 HDD의 내용을 새로 추가 된 /dev/sdb HDD로 복제 작업을 진행
   - dd 작업의 경우 현재 사용중이지 않은 비어있는 공간을 함께 복제를 진행한다.

# fdisk -l /dev/sdb
Disk /dev/sdb: 42.9 GB, 42949672960 bytes, 83886080 sectors
Units = sectors of 1 * 512 = 512 bytes
Sector size (logical/physical): 512 bytes / 512 bytes
I/O size (minimum/optimal): 512 bytes / 512 bytes
Disk label type: dos
Disk identifier: 0x000a7d0f
 Device Boot Start End Blocks Id System
/dev/sdb1 * 2048 2099199 1048576 83 Linux
/dev/sdb2 2099200 83886079 40893440 8e Linux LVM
- 복제 된 디스크의 정보를 확인
- 실제 VM이 저장 된 경로를 이동하여 새로 추가 한 가상 HDD 파일을 확인 ( vmdk 확장자 )
- 새로 압축해제 한 Linux System에서 기존 HDD 제거 후 복제 된 HDD를 해당 VM Directory에 붙여넣기 진행
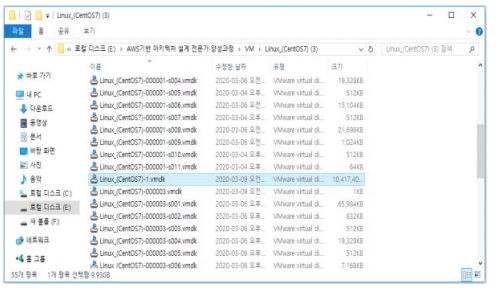
- 새로운 Linux System을 압축해제 후 위에서 확인 한 가상 HDD를 복사 후 붙여넣기 진행
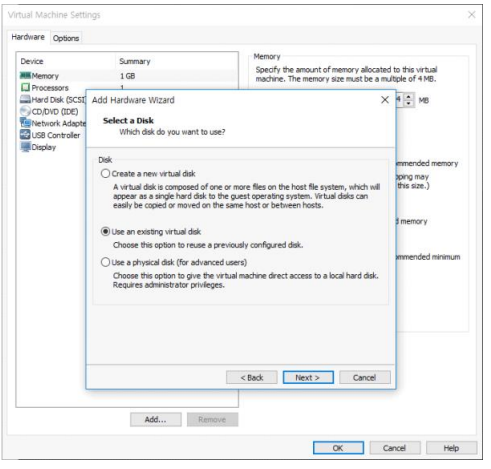

- 새로운 HDD 추가가 아닌, 기존에 갖고 있던 가상의 HDD를 추가하기위해 2번째 메뉴 선택
- 위에서 복사 한 가상 HDD 선택 후 불러오기를 진행
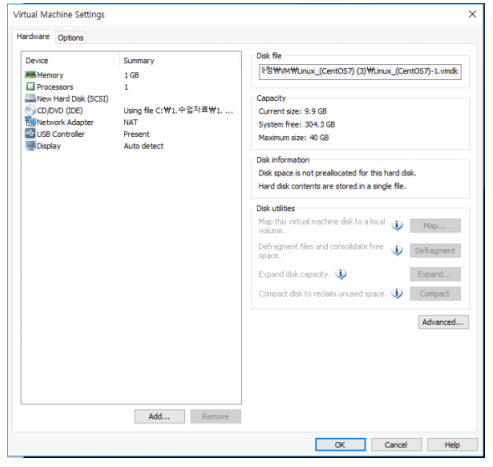
- 기존 HDD 삭제 후 새로 불러온 가상 HDD만 유지한채 부팅을 진행한다.
# ifconfig
ens33: flags=4163<UP,BROADCAST,RUNNING,MULTICAST> mtu 1500
 inet 192.168.1.100 netmask 255.255.255.0 broadcast 192.168.1.255
 inet6 fe80::20c:29ff:feb1:a0fa prefixlen 64 scopeid 0x20<link>
 ether 00:0c:29:b1:a0:fa txqueuelen 1000 (Ethernet)
 RX packets 1081 bytes 1464136 (1.3 MiB)
 RX errors 0 dropped 0 overruns 0 frame 0
 TX packets 319 bytes 25078 (24.4 KiB)
 TX errors 0 dropped 0 overruns 0 carrier 0 collisions 0

# ls -ld ./a ./b ./c ./d
-rw-r--r-- 1 root root 0 3월 9 10:02 ./a
-rw-r--r-- 1 root root 0 3월 9 10:02 ./b
-rw-r--r-- 1 root root 0 3월 9 10:02 ./c
-rw-r--r-- 1 root root 0 3월 9 10:02 ./d
   - 부팅 완료 후 IP주소 설정 확인 및 테스트를 위해 새로 생성한 파일을 확인
$ TimeShift를 이용한 Snapshot 생성
[ 새로운 40GB HDD 추가후 작업 진행 ( 반드시 SingleFile 형식으로 추가 ) ]
# fdisk /dev/sdb ( n -> p -> 1 -> Enter -> Enter -> w )
# mkfs.xfs /dev/sdb1
# yum -y install epel-release
# yum -y install timeshift
# rpm -qa | grep timeshift
timeshift-18.4-1.el7.x86_64
   - EPEL 저장소를 추가 후 TimeShift Tool 설치
- TimeShift 초기구성 마법사 진행
- Rsync 형식의 Snapshot을 생성하며, 새로 추가된 40GB 장치가 Snapshot을 저장 할 장치로 설정
- 스케줄의 경우 매월, 매주, 매일, 매시간, 부트별로 설정이 가능

- 만들기 버튼을 이용하여, 즉시 Snapshot을 생성
# rm -rf /var/log
- 생성 한 Snapshot을 이용하여, 복구 작업 진행
# ls -ld /var/log
drwxr-xr-x 19 root root 4096 3월 9 18:48 /var/log
- /var/log 디렉터리가 복원된 것을 확인'리눅스(Linux)' 카테고리의 다른 글
| [Centos 7] PAM (Pluggable Authentication Modules) 실습 (0) | 2022.11.29 |
|---|---|
| [Centos 7] Linux Authentication Module - PAM (Pluggable Authentication Modules) (0) | 2022.11.29 |
| [Centos 7] Linux Backup 관리(Tar, xfsdump, xfsrestore, dd, TimeShift, Rsync) (0) | 2022.11.29 |
| [Centos 7] NFS (Network File System) (0) | 2022.11.28 |
| [Centos 7] FTP (File Transfer Protocol) (0) | 2022.11.28 |