2022. 12. 2. 00:34ㆍ리눅스(Linux)
SSL와 TLS
- Secure Socket Layer의 준말로, 넷스케이프사에서 전자상거래 등의 보안을 위해 개발한 프로토콜이다.
- SSL 3.0 버전을 기초로 IETF에서 표준화하며 TLS (Transport Layer Security)라는 이름으로 명명 되었다.
$ SSL와 TLS 기능
- 사이트 인증 (Site Authentication)
- 데이터 보호 (Data Privacy)
- 무결성 체크 (Data Integrity)
Site Authentication


Data Privacy


Data Integrity
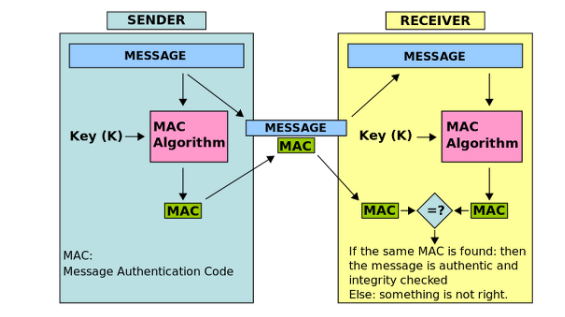
- 네트워크를 통해 전달된 데이터가 중간에 무단으로 수정되지 않도록 보장할 수 있도록 인증코드(MAC)를 사용한다.
- 필수는 아니며, 통신 양측간의 협상에 따라 결정된다.

$ LAB >>> SSL/TLS 패킷 분석
- 와이어샤크로 HTTP 패킷과 SSL/TLS 패킷을 수집한다.
- SSL/TSL는 몇 계층에서 사용되는지 헤더 위치로 확인하고, 일반적인 HTTP와는 어떻게 다른지 비교해본다.
$ SSL/TLS 헤더 구조
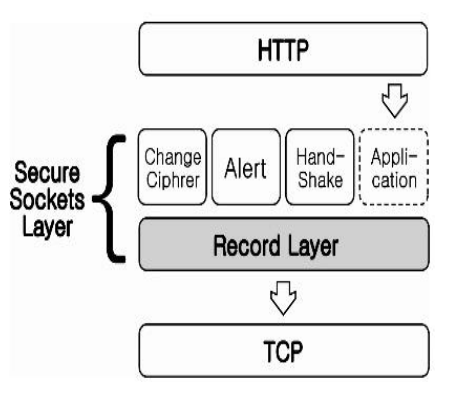
- SSL은 2개의 계층으로 구성되어 있다.
- Record Layer와 이를 사용하는 4가지의 프로토콜로 구성.

Record Layer
- 위의 네 프로토콜을 감싸는 역할
- 각 프로토콜 내용의 앞 부분에 추가 정보를 덧붙이고, 뒷부분에 MAC 메시지 인증코드를 붙임
- 데이터를 TCP 패킷으로 변환하기 위해 Fragmentation, 레코드 압축과 해제, 메시지 인증 및 암호화, 복호화 기능 수행


Handshake protocol
- SSL 연결과 상호 암호화 방식을 협의할 때 사용하는 프로토콜


- Handshake Protocol의 메시지는 연속되어 Record Layer 프로토콜 안에 들어갈 수 있다.
- Type : Handshake Protocol의 종류 - 1바이트
- Length : Handshake Message 길이 - 3바이트

- 키교환 : RSA, Diffie-Hellman, ECDH, SRP, PSK
- 인증 : RSA, DSA, ECDSA
- 대칭키 암호 : RC4, 3DES, AES, IDEA, Camellia
- 해시함수 : TSL - HMAC-MD5, HMAC-SHA / SSL – MD5, SHA (Old ver. MD2, MD4)
ChangeCipherSpec protocol
- Handshake Protocol 에 의해 정해진 암호화 파라미터를 적용하여 통신
- 위 내용의 신호만 알려주면 되기에 고정으로 1이 들어감


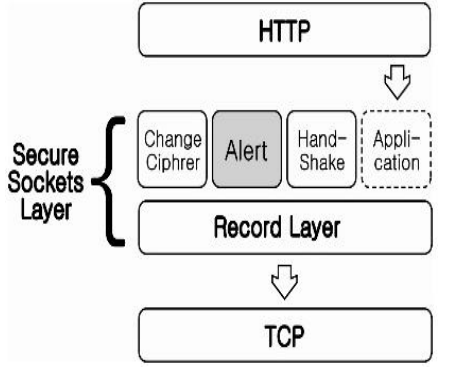
Alert protocol
- 에러나, 주의 같은 정상적이지 않은 상황을 알리기 위해 사용
- Alert Level과 Alert Description이 각각 1바이트씩 구성


$ Apache + SSL/TLS
- web 서버에 보안프로토콜 적용

# yum -y install httpd-*
# vi /etc/httpd/conf/httpd.conf
95 ServerName www.kgitbank.com:80
119 DocumentRoot "/apache/www"

<Directory "/apache/www">
    AllowOverride None
    Require all granted
</Directory>

331 <VirtualHost *:80>
332         ServerName www.kgitbank.com
333         Redirect "/" "https://www.kgitbank.com/"
334 </VirtualHost>

# yum -y install mod_ssl
# rpm -qa | grep mod_ssl
mod_ssl-2.4.6-90.el7.centos.x86_64

# rpm -qa | grep openssl
openssl-libs-1.0.2k-19.el7.x86_64
openssl-devel-1.0.2k-19.el7.x86_64
openssl-1.0.2k-19.el7.x86_64
xmlsec1-openssl-1.2.20-7.el7_4.x86_64

# openssl genrsa -out /etc/pki/tls/private/kgitbank.key 2048
Generating RSA private key, 2048 bit long modulus
......................+++
...........................+++
e is 65537 (0x10001)
   - 개인키 생성

# openssl req -new -key /etc/pki/tls/private/kgitbank.key -out /etc/pki/tls/private/kgitbank.csr
You are about to be asked to enter information that will be incorporated
into your certificate request.
What you are about to enter is what is called a Distinguished Name or a DN.
There are quite a few fields but you can leave some blank
For some fields there will be a default value,
If you enter '.', the field will be left blank.
-----
Country Name (2 letter code) [XX]:KR
State or Province Name (full name) []:Seoul
Locality Name (eg, city) [Default City]:Gangnam
Organization Name (eg, company) [Default Company Ltd]:KGitbank
Organizational Unit Name (eg, section) []:Cloud Team
Common Name (eg, your name or your server's hostname) []:www.kgitbank.com
Email Address []:itbank@naver.com

Please enter the following 'extra' attributes
to be sent with your certificate request
A challenge password []: "Enter"
An optional company name []: "Enter"
   - SSL 요청서 작성

# openssl x509 -req -days 365 -in /etc/pki/tls/private/kgitbank.csr -signkey /etc/pki/tls/private/kgitbank.key -out /etc/pki/tls/certs/kgitbank.crt
Signature ok
subject=/C=KR/ST=Seoul/L=Gangnam/O=KGitbank/OU=Cloud Team/CN=www.kgitbank.com/emailAddress=itbank@naver.com
Getting Private key

# ls -l /etc/pki/tls/private/
합계 12
-rw-r--r-- 1 root root 1066  3월 16 11:40 kgitbank.csr
-rw-r--r-- 1 root root 1679  3월 16 11:32 kgitbank.key

# ls -l /etc/pki/tls/certs/kgitbank.crt
-rw-r--r-- 1 root root 1322  3월 16 11:43 /etc/pki/tls/certs/kgitbank.crt

# cat /etc/pki/tls/private/kgitbank.key
# cat /etc/pki/tls/private/kgitbank.csr
# cat /etc/pki/tls/certs/kgitbank.crt

# vi /etc/httpd/conf.d/ssl.conf
56 <VirtualHost *:443>
59 DocumentRoot "/apache/test"
60 ServerName www.kgitbank.com:443
70 SSLEngine on
100 SSLCertificateFile /etc/pki/tls/certs/kgitbank.crt
107 SSLCertificateKeyFile /etc/pki/tls/private/kgitbank.key

[ 선택영역 : 사용 프로토콜 및 CipherSuite 정의 ]
# vi /etc/httpd/conf.d/ssl.conf
75 SSLProtocol -All +TLSv1.2
   -  –ALL 모두 거부 , + TLSv1.2 허용

80 SSLCipherSuite ECDHE-RSA-AES128-GCM-SHA256:ECDHE-RSA-AES256-GCM-SHA384:ECDHERSA-AES128-SHA:ECDHE-RSA-AES256-SHA:ECDHE-RSA-AES128-SHA256:ECDHE-RSA-AES256-SHA384
   - 기존내용 지우고 새로 정의

# mkdir -p /apache/test
# cat > /apache/test/index.html
Apache SSL WEB Test!

# apachectl configtest
Syntax OK

# systemctl start httpd
# systemctl enable httpd
# firewall-cmd --permanent --add-service=http
# firewall-cmd --permanent --add-service=https
# firewall-cmd --reload
# firewall-cmd --list-all
$ Virtual Host + SSL/TLS
- Virtual Host를 이용하여 여러 WEB Site를 제공하면서, 모든 Virtual Host에 대한 SSL 작업을 진행
# vi /etc/httpd/conf.d/vhost.conf

### Local Host ###
<VirtualHost *:80>
	DocumentRoot	/apache/www
	ServerName	www.itbank.com
	Redirect	"/" "https://www.itbank.com/"
</VirtualHost>

### Virtual Host ###
<VirtualHost *:80>
	DocumentRoot	/apache/cafe
	ServerName	cafe.itbank.com
	Redirect	"/" "https://cafe.itbank.com/"
	ErrorLog	logs/cafe.itbank.com-error_log
	CustomLog	logs/cafe.itbank.com-access_log combined
</VirtualHost>

<VirtualHost *:80>
	DocumentRoot	/apache/blog
	ServerName	blog.itbank.com
	Redirect	"/" "https://cafe.itbank.com/"
	ErrorLog	logs/blog.itbank.com-error_log
	CustomLog	logs/blog.itbank.com-access_log combined
</VirtualHost>

<VirtualHost *:80>
	DocumentRoot	/home/user1/public_html
	ServerName	user1.itbank.com/~user1
	Redirect	"/" "https://user1.itbank.com/~user1"
	ErrorLog	logs/user1.itbank.com-error_log
	CustomLog	logs/user1.itbank.com-access_log combined
</VirtualHost>


# vi /etc/httpd/conf.d/ssl.conf

<VirtualHost _default_:443>
	DocumentRoot		"/apache/cafe"
	ServerName		cafe.itbank.com:443
	SSLCertificateKeyFile 	/etc/pki/tls/private/itbank.key
	SSLCertificateFile      /etc/pki/tls/certs/itbank.crt
</VirtualHost>

<VirtualHost _default_:443>
	DocumentRoot		"/apache/blog"
	ServerName		blog.itbank.com:443
	SSLCertificateKeyFile 	/etc/pki/tls/private/itbank.key
	SSLCertificateFile	/etc/pki/tls/certs/itbank.crt
</VirtualHost>

<VirtualHost _default_:443>
	DocumentRoot 		"/home/user1/public_html"
	ServerName 		user1.itbank.com/~user1:443
	SSLCertificateKeyFile 	/etc/pki/tls/private/itbank.key
	SSLCertificateFile      /etc/pki/tls/certs/itbank.crt
</VirtualHost>
$ Vsftpd + SSL/TLS
# yum -y install vsftpd
# mkdir /etc/vsftpd/ssl
# openssl req -x509 -nodes -days 365 -newkey rsa:2048 -keyout /etc/vsftpd/ssl/vsftpd.pem -out /etc/vsftpd/ssl/vsftpd.pem
# firewall-cmd --permanent --add-service=ftp
# firewall-cmd --permanent --add-port=2000-2010/tcp
# firewall-cmd --reload

# vi /etc/vsftpd/vsftpd.conf
rsa_cert_file=/etc/vsftpd/ssl/vsftpd.pem
rsa_private_key_file=/etc/vsftpd/ssl/vsftpd.pem
ssl_enable=YES
allow_anon_ssl=NO
force_local_data_ssl=YES
force_local_logins_ssl=YES
ssl_tlsv1=YES
ssl_sslv2=NO
ssl_sslv3=NO
ssl_ciphers=HIGH
require_ssl_reuse=NO
   - 데이터 전송 세션 재사용 기능
   ( 클라이언트에서 해당 기능을 지원하지 않을경우 SSL/TLS 연결이 끊김 )

pasv_enable=YES
pasv_min_port=2000
pasv_max_port=2010

# systemctl start vsftpd
# systemctl enable vsftpd


- 클라이언트에서 반드시 SSL/TLS로 연결작업을 진행해야 한다.
- 패킷을 캡처 후 데이터가 암호되어 전송되는지 확인'리눅스(Linux)' 카테고리의 다른 글
| SQL (Structured Query Language) 예제 1 (0) | 2022.12.04 |
|---|---|
| [Centos 7] DB (Database) & DB Replication ( 읽기 전용 복제본 ) (0) | 2022.12.04 |
| 암호화 기초 알고리즘[ 대칭 키(비밀 키), 비대칭 키(공개 키), 키 교환, 해시 ] (0) | 2022.12.01 |
| [Centos 7] Apache 서버 구동 (httpd 패키지) (0) | 2022.12.01 |
| Web Server (웹 서버) & WAS Server (왓스 서버)& 웹 프로그래밍 (0) | 2022.11.30 |